> ## Documentation Index
> Fetch the complete documentation index at: https://docs.getcuemanager.com/llms.txt
> Use this file to discover all available pages before exploring further.
# The POS terminal
> Sell food, drinks, and equipment — standalone or attached to a table.
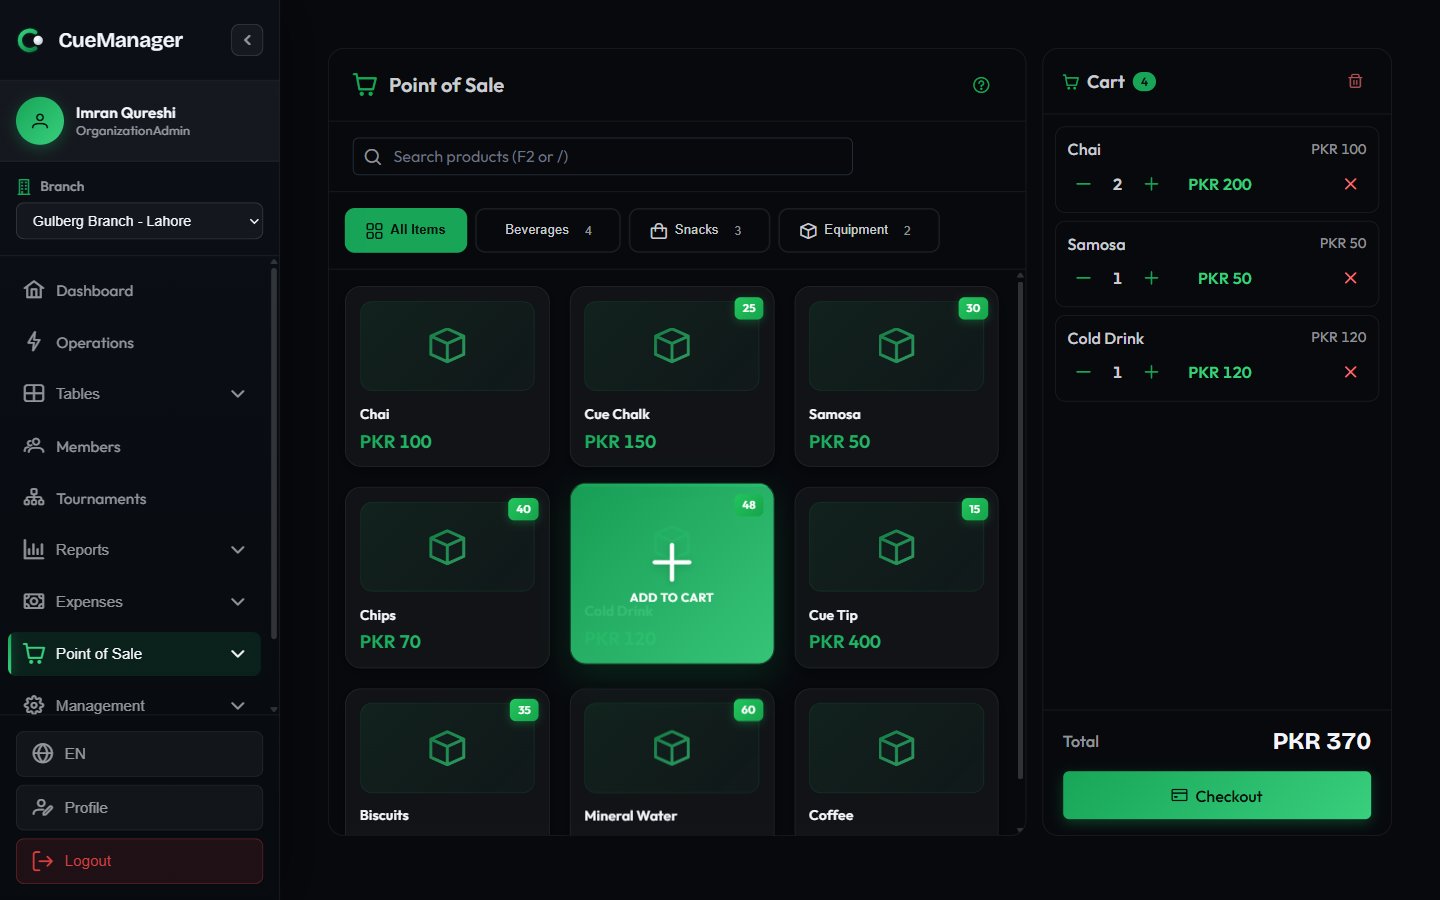
The terminal is the till your counter staff use to ring up chai, cold drinks, snacks, and equipment. Every sale can stand on its own, be charged to a table that is still playing, or be pushed onto an open customer tab to pay later.
Open it from **Point of Sale → Terminal**. You need POS **View** permission and a branch selected in the sidebar.
## Ring up a cart
The category strip runs across the top: **All Items** plus each category you have created, such as Drinks, Snacks, and Equipment. Keys `1`–`9` jump straight to a category.
Click any product card to add one to the cart, or type in **Search products (F2 or /)** to filter by name. The card shows the price and, for stock-tracked items, a stock badge. Items that are out of stock cannot be sold — the card is disabled with a **Cannot sell - out of stock** tooltip.
The **Cart** panel on the right lists each line with its quantity, line total, and a remove button. Use the minus and plus buttons to change quantity; the plus button stops at the available stock for tracked items. **Clear Cart** empties the whole cart.
Press **Checkout** at the bottom of the cart, or `F9`, once the total looks right.
 ## Where the sale lands
The checkout dialog decides who pays and when. Three destinations are possible.
| Destination | How to choose it | What happens |
| ------------------ | -------------------------------------------------------------------------------------------------- | ------------------------------------------------------------------------------------------------------------------ |
| Standalone sale | Leave **Charge to Table (optional)** on **No table (standalone sale)** and press **Complete Sale** | Paid at the counter and recorded as a normal sale |
| Charged to a table | Pick the running session under **Charge to Table (optional)** | The sale is linked to that session and shows up on the bill at [session checkout](/sessions/checkout-and-payments) |
| Added to a tab | Press **Add to Tab** instead of **Complete Sale** | Nothing is collected now; the amount joins the customer's [open tab](/pos/customer-tabs) |
The **Charge to Table (optional)** dropdown lists the branch's active sessions, labelled with the table and the players — for example `Snooker 2 · Ahmed Raza vs Bilal Khan`.
**Add to Tab** and the **Existing tab (optional)** picker only appear when the branch has **Enable open tabs (running bills) for this branch** switched on. See [Branches](/admin/branches).
## Complete a sale
Switch between **Walk-in** and **Member**. A walk-in can stay anonymous or be given a name in **Customer name (optional)**; for a member, search by name or phone. A tab needs a named customer — press **Add to Tab** without one and the dialog asks you to enter a name or select a member.
**Order Summary** lists each line with its quantity, then **Subtotal**, a **Tax** row if a tax rate applies to your club, and **Total Amount**.
Choose a **Payment Method**, then enter what the customer handed over under **Amount Received**. The **Quick Add** buttons add 100, 500, or 1000 (`F5`, `F6`, `F7`) and **Exact** (`F8`) fills the exact total, so a Rs 100 chai plus a Rs 400 round is one keypress. **Change to Give** updates as you type.
Add anything worth recording under **Notes (Optional)** and press **Complete Sale**. The sale gets a sale number and appears in [sales history](/pos/catalog-and-stock#sales-history).
### Payment methods
| Method | Notes |
| ---------------------- | ----------------------------------------------------------------------------------------------------------------------- |
| Cash | Default; **Change to Give** is calculated for you |
| Card | Card machine at the counter |
| JazzCash | Mobile wallet |
| Easypaisa | Mobile wallet |
| Raast | Instant bank transfer |
| Bank Transfer | Direct transfer to the club account |
| Credit (Member Wallet) | Members only. A badge shows whether the wallet covers the total — see [Wallets and credit](/members/wallets-and-credit) |
**Complete Sale** stays disabled while **Amount Received** is less than the total, and the dialog shows **Amount is less than total**. If the customer cannot pay in full, put the sale on a tab rather than shorting the till.
## Keyboard shortcuts
The terminal is built for a keyboard-first counter. Press `F1` at any time for the full list.
| Key | Action |
| ----------- | ---------------------------- |
| `F1` | Show this help |
| `F2` or `/` | Focus search bar |
| `1`–`9` | Select category by number |
| Arrow keys | Navigate products |
| `Enter` | Add selected product to cart |
| `F9` | Open checkout |
| `F12` | Clear cart |
| `Esc` | Close dialogs, clear search |
## Selling while offline
The till keeps working without a connection. Sales you ring up are saved on the device and sent when the network returns, and the header shows a **sale(s) waiting** counter so whoever hands over the shift can see that some sales have not reached the server yet.
Two things behave differently offline:
* The total may be marked **Estimated total** — the server could not price the cart, so the till applied the last tax rate it saw.
* Stock can go below zero when queued sales replay against a shelf that has since been sold down. Affected items get an oversold badge you can click to open the item's stock ledger, and the sale is tagged **Recount** in sales history.
See [Offline and sync](/concepts/offline-and-sync) for the full picture.
## Related
Create the categories and items the terminal sells, and keep stock counts honest.
Run a bill across sessions and sales, then settle once.
## Where the sale lands
The checkout dialog decides who pays and when. Three destinations are possible.
| Destination | How to choose it | What happens |
| ------------------ | -------------------------------------------------------------------------------------------------- | ------------------------------------------------------------------------------------------------------------------ |
| Standalone sale | Leave **Charge to Table (optional)** on **No table (standalone sale)** and press **Complete Sale** | Paid at the counter and recorded as a normal sale |
| Charged to a table | Pick the running session under **Charge to Table (optional)** | The sale is linked to that session and shows up on the bill at [session checkout](/sessions/checkout-and-payments) |
| Added to a tab | Press **Add to Tab** instead of **Complete Sale** | Nothing is collected now; the amount joins the customer's [open tab](/pos/customer-tabs) |
The **Charge to Table (optional)** dropdown lists the branch's active sessions, labelled with the table and the players — for example `Snooker 2 · Ahmed Raza vs Bilal Khan`.
**Add to Tab** and the **Existing tab (optional)** picker only appear when the branch has **Enable open tabs (running bills) for this branch** switched on. See [Branches](/admin/branches).
## Complete a sale
Switch between **Walk-in** and **Member**. A walk-in can stay anonymous or be given a name in **Customer name (optional)**; for a member, search by name or phone. A tab needs a named customer — press **Add to Tab** without one and the dialog asks you to enter a name or select a member.
**Order Summary** lists each line with its quantity, then **Subtotal**, a **Tax** row if a tax rate applies to your club, and **Total Amount**.
Choose a **Payment Method**, then enter what the customer handed over under **Amount Received**. The **Quick Add** buttons add 100, 500, or 1000 (`F5`, `F6`, `F7`) and **Exact** (`F8`) fills the exact total, so a Rs 100 chai plus a Rs 400 round is one keypress. **Change to Give** updates as you type.
Add anything worth recording under **Notes (Optional)** and press **Complete Sale**. The sale gets a sale number and appears in [sales history](/pos/catalog-and-stock#sales-history).
### Payment methods
| Method | Notes |
| ---------------------- | ----------------------------------------------------------------------------------------------------------------------- |
| Cash | Default; **Change to Give** is calculated for you |
| Card | Card machine at the counter |
| JazzCash | Mobile wallet |
| Easypaisa | Mobile wallet |
| Raast | Instant bank transfer |
| Bank Transfer | Direct transfer to the club account |
| Credit (Member Wallet) | Members only. A badge shows whether the wallet covers the total — see [Wallets and credit](/members/wallets-and-credit) |
**Complete Sale** stays disabled while **Amount Received** is less than the total, and the dialog shows **Amount is less than total**. If the customer cannot pay in full, put the sale on a tab rather than shorting the till.
## Keyboard shortcuts
The terminal is built for a keyboard-first counter. Press `F1` at any time for the full list.
| Key | Action |
| ----------- | ---------------------------- |
| `F1` | Show this help |
| `F2` or `/` | Focus search bar |
| `1`–`9` | Select category by number |
| Arrow keys | Navigate products |
| `Enter` | Add selected product to cart |
| `F9` | Open checkout |
| `F12` | Clear cart |
| `Esc` | Close dialogs, clear search |
## Selling while offline
The till keeps working without a connection. Sales you ring up are saved on the device and sent when the network returns, and the header shows a **sale(s) waiting** counter so whoever hands over the shift can see that some sales have not reached the server yet.
Two things behave differently offline:
* The total may be marked **Estimated total** — the server could not price the cart, so the till applied the last tax rate it saw.
* Stock can go below zero when queued sales replay against a shelf that has since been sold down. Affected items get an oversold badge you can click to open the item's stock ledger, and the sale is tagged **Recount** in sales history.
See [Offline and sync](/concepts/offline-and-sync) for the full picture.
## Related
Create the categories and items the terminal sells, and keep stock counts honest.
Run a bill across sessions and sales, then settle once.